ceph版本说明
代号 版本号 状态 发布时间 支持截止 重要特性
Octopus 15.2
终止支持
2020-03-20
2022-06
引入 cephadm
Pacific 16.2
LTS 支持中
2021-03-31
2025-03
RBD 即时克隆
Quincy 17.2
LTS 稳定版
2022-04-19
2026-05
增强安全性
Reef 18.2
STS 稳定版
2023-05-31
2024-05
性能优化
Squid 19.2
开发中
-
-
下一代版本
其中红帽 Ceph Storage 5 对应上游 Ceph 的 Octopus 版本 (v15.2.x)
这里有Octopus还支持在Centos7.9上部署,因为7.9内核版本实在太低了
部署方式介绍
方式 自动化程度 学习曲线 K8s集成 适用规模 运维复杂度
ceph-deploy ❌ 最低
⭐⭐⭐⭐⭐
❌
<10 节点
高
cephadm ✅ 高
⭐⭐
✅
任意规模
低
Rook ✅ 极高
⭐
✅ 原生
云原生环境
极低
ceph-ansible ✅ 中
⭐⭐⭐
⚠️ 需适配
50-500 节点
中
商业工具 ✅ 高
⭐
✅
大规模企业级
低
之前用ceph-deploy部署过,那真是太折磨了
cephadm组件
cephadm shell:用来执行集群部署与管理任务的命令行
cephadm orchestrator:协调集群之间的配置更改
cephadm特点
可以登录到镜像仓库来拉取ceph镜像,并使用对应镜像在ceph节点上进行部署
使用ssh连接,可以向集群中添加主机,添加存储和监控主机
使用容器化部署,在bootstrap节点上不需要额外的软件,在bootstrap上使用命令行部署集群
提供了两个接口管理ceph,一个是命令行,一个是GUI,初始化集群后默认部署
使用ceph orchestrator(编排器)作为守护进程,支持扩容缩容集群
集群部署流程 1 2 3 4 5 6 7 8 9 1.在bootstrap节点上安装cephadm-ansible的包 2.运行cephadm的预安装playbook 3.使用cephadm引导集群 (1)bootstrap节点安装与启动ceph Mon与Mgr (2)创建/etc/ceph目录 (3)准备ssh密钥放入/etc/ceph/ceph.pub,并添加到authorozed_keys,做免密 (4)将集群通信最小配置文件写入/etc/ceph/ceph.conf (5)写入/etc/ceph/ceph.client.admin.keyring管理密钥client.admin (6)使用监控组件,如Prometheus grafana
集群部署 环境说明 1 2 3 4 5 6 7 8 9 10 11 12 13 14 15 16 17 18 19 20 21 22 23 24 25 26 192.168.10.110 ansible 192.168.10.141 cephadm-1 192.168.10.142 cephadm-2 192.168.10.143 cephadm-3 ansible与ceph主机均为Rocky8.10 3*60G SATA盘 ceph v17.2.8 quincy (stable) nmcli con modify ens18 ipv4.addresses 192.168.10.141/24 ipv4.gateway 192.168.10.1 \ ipv4.method manual ipv4.dns 8.8.8.8 nmcli connection up ens18 hostnamectl set-hostname cephadm-1 && bash nmcli con modify ens18 ipv4.addresses 192.168.10.142/24 ipv4.gateway 192.168.10.1 \ ipv4.method manual ipv4.dns 8.8.8.8 nmcli connection up ens18 hostnamectl set-hostname cephadm-2 && bash nmcli con modify ens18 ipv4.addresses 192.168.10.143/24 ipv4.gateway 192.168.10.1 \ ipv4.method manual ipv4.dns 8.8.8.8 nmcli connection up ens18 hostnamectl set-hostname cephadm-3 && bash
cephadm-ansible环境检查 1 2 3 4 5 6 7 8 9 10 11 12 13 14 15 16 17 18 19 20 21 22 23 24 25 26 27 28 29 30 31 32 33 34 35 36 37 38 39 40 41 42 43 44 45 46 47 48 49 50 51 52 53 54 55 56 57 58 59 60 61 62 63 64 yum -y install yum-utils yum-config-manager --add-repo https://mirrors.aliyun.com/docker-ce/linux/centos/docker-ce.repo yum -y install docker-ce docker-ce-cli containerd.io docker-buildx-plugin docker-compose-plugin cat > /etc/docker/daemon.json << EOF { "registry-mirrors":["[https://a88uijg4.mirror.aliyuncs.com](https://a88uijg4.mirror.aliyuncs.com/)", "[https://docker.lmirror.top](https://docker.lmirror.top/)", "[https://docker.m.daocloud.io](https://docker.m.daocloud.io/)", "[https://hub.uuuadc.top](https://hub.uuuadc.top/)", "[https://docker.anyhub.us.kg](https://docker.anyhub.us.kg/)", "[https://dockerhub.jobcher.com](https://dockerhub.jobcher.com/)", "[https://dockerhub.icu](https://dockerhub.icu/)", "[https://docker.ckyl.me](https://docker.ckyl.me/)", "[https://docker.awsl9527.cn](https://docker.awsl9527.cn/)", "[https://docker.laoex.link](https://docker.laoex.link/)"] } EOF systemctl daemon-reload systemctl restart docker systemctl enable docker yum -y install python3 ansible-core git clone https://github.com/ceph/cephadm-ansible.git cd cephadm-ansiblevim inventory [admin] ansible ansible_host=192.168.10.110 [storage] cephadm-1 ansible_host=192.168.10.141 cephadm-2 ansible_host=192.168.10.142 cephadm-3 ansible_host=192.168.10.143 ansible-galaxy collection install community.general ansible -i inventory storage -m yum -a 'name=podman,runc state=absent' ansible -i inventory storage -m yum -a 'name=yum-utils state=present' ansible -i inventory storage -m shell -a 'yum-config-manager --add-repo https://mirrors.aliyun.com/docker-ce/linux/centos/docker-ce.repo' ansible -i inventory storage -m yum -a 'name=docker-ce,docker-ce-cli,containerd.io,docker-buildx-plugin,docker-compose-plugin state=present disable_gpg_check=yes' ansible -i inventory storage -m copy -a 'src=/etc/docker/daemon.json dest=/etc/docker/daemon.json' ansible -i inventory storage -m shell -a 'systemctl daemon-reload' ansible -i inventory storage -m service -a 'name=docker state=restarted' ansible -i inventory storage -m service -a 'name=docker enabled=yes' ceph_defaults/defaults/main.yml 关键变量: ceph_release: 17.2.8 ceph_mirror: https://mirrors.aliyun.com/ceph ceph_stable_key: https://mirrors.aliyun.com/ceph/keys/release.asc 相关仓库可以在https://mirrors.aliyun.com/ceph中查找是否支持 ansible-playbook -i inventory cephadm-preflight.yml 能跑完就ok,cephadm和ceph-common全都安装好了
cephadm引导集群安装 配完docker镜像加速之后镜像能随便拉
单机创建集群(不推荐)
1 2 3 4 5 6 7 8 9 10 11 12 13 14 cephadm bootstrap \ --mon-ip 192.168.10.110 \ --initial-dashboard-user admin \ --initial-dashboard-password wangsheng ... URL: https://ansible:8443/ User: admin Password: wangsheng ... Bootstrap complete. ceph orch host add cephadm-1 192.168.10.142
使用配置文件批量添加(推荐)
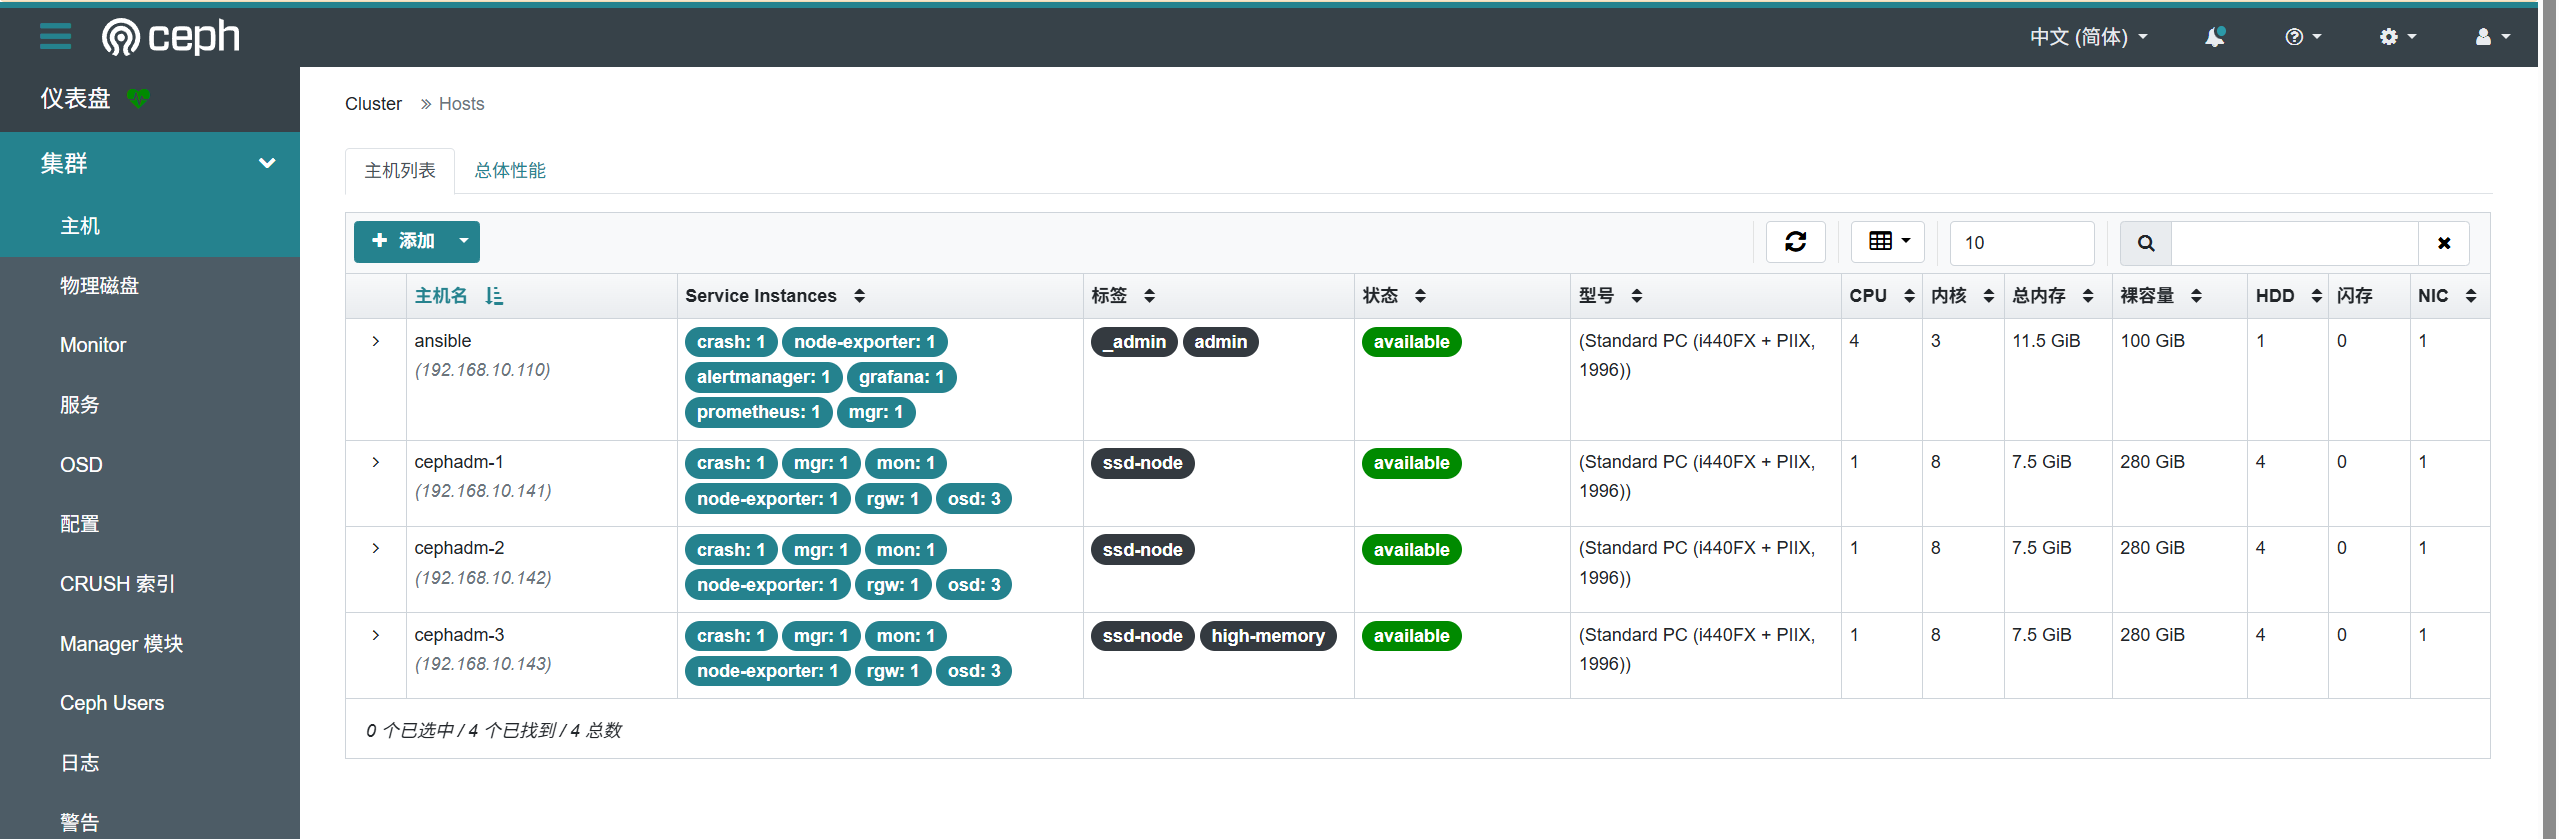
1 2 3 4 5 6 7 8 9 10 11 12 13 14 15 16 17 18 19 20 21 22 23 24 25 26 27 28 29 30 31 32 33 34 35 36 37 38 39 40 41 42 43 44 45 46 47 48 49 50 51 52 53 54 55 56 57 58 59 60 61 62 63 64 65 66 67 68 69 70 71 72 73 74 75 76 77 78 79 80 81 82 83 84 85 86 87 88 89 90 91 92 93 94 95 96 97 98 99 100 101 102 103 104 105 106 107 108 109 110 111 112 113 114 115 116 117 118 vim /etc/ceph/initial-config-primary-cluster.yaml service_type: host addr: 192.168.10.110 hostname: ansible labels: [admin] --- service_type: host addr: 192.168.10.141 hostname: cephadm-1 labels: - ssd-node --- service_type: host addr: 192.168.10.142 hostname: cephadm-2 labels: - ssd-node --- service_type: host addr: 192.168.10.143 hostname: cephadm-3 labels: - ssd-node - high-memory --- service_type: mon placement: hosts: - cephadm-1 - cephadm-2 - cephadm-3 --- service_type: rgw service_id: realm.zone placement: hosts: - cephadm-1 - cephadm-2 - cephadm-3 --- service_type: mgr placement: hosts: - cephadm-1 - cephadm-2 - cephadm-3 --- service_type: osd service_id: default_drive_group placement: host_pattern: 'cephadm-*' label: "ssd-node" count: 3 data_devices: paths: - /dev/sdb - /dev/sdc - /dev/sdd cephadm bootstrap --mon-ip=192.168.10.110 \ --initial-dashboard-password=wangsheng \ --initial-dashboard-user admin \ --dashboard-password-noupdate --allow-fqdn-hostname \ --apply-spec /etc/ceph/initial-config-primary-cluster.yaml \ --allow-overwrite Enabling autotune for osd_memory_target You can access the Ceph CLI with: sudo /usr/sbin/cephadm shell --fsid 8b27889e-52af-11f0-bedb-bc2411f9a113 -c /etc/ceph/ceph.conf -k /etc/ceph/ceph.client.admin.keyring Please consider enabling telemetry to help improve Ceph: ceph telemetry on Bootstrap complete. ceph orch ls NAME PORTS RUNNING REFRESHED AGE PLACEMENT alertmanager ?:9093,9094 1/1 3m ago 10m count:1 crash 4/4 4m ago 10m * grafana ?:3000 1/1 3m ago 10m count:1 mgr 3/3 4m ago 9m cephadm-1;cephadm-2;cephadm-3 mon 3/3 4m ago 9m cephadm-1;cephadm-2;cephadm-3 node-exporter ?:9100 4/4 4m ago 10m * osd.default_drive_group 3 4m ago 9m count:3;label:ssd-node;cephadm-* prometheus ?:9095 1/1 3m ago 10m count:1 rgw.realm.zone ?:80 3/3 4m ago 7m cephadm-1;cephadm-2;cephadm-3 可以看到mon和mgr都只有这三个节点有,主节点没有 service_type: mgr placement: hosts: - ansible - cephadm-1 - cephadm-2 - cephadm-3 ceph orch apply -i /etc/ceph/initial-config-primary-cluster.yaml ceph orch ls NAME PORTS RUNNING REFRESHED AGE PLACEMENT alertmanager ?:9093,9094 1/1 25s ago 23m count:1 crash 4/4 7m ago 23m * grafana ?:3000 1/1 25s ago 23m count:1 mgr 4/4 7m ago 104s ansible;cephadm-1;cephadm-2;cephadm-3 mon 3/3 7m ago 104s cephadm-1;cephadm-2;cephadm-3 node-exporter ?:9100 4/4 7m ago 23m * osd.default_drive_group 3 7m ago 104s count:3;label:ssd-node;cephadm-* prometheus ?:9095 1/1 25s ago 23m count:1 rgw.realm.zone ?:80 3/3 7m ago 87s cephadm-1;cephadm-2;cephadm-3 Ceph MGR 以高可用模式运行,多个实例通过仲裁选举一个 Leader(活跃节点)。 客户端访问 Dashboard 时,MGR 会返回 Leader 节点的地址(通过 HTTP 302 重定向)。 我现在的leader节点就是143
集群的重新安装 1 2 3 4 5 6 7 8 9 10 11 12 13 14 15 16 17 已经使用cephadm bootstrap后的bootstrap节点 如果再使用cephadm bootstrap就会因为节点上有mon等服务,端口检查报错: cephadm bootstrap --mon-ip=192.168.10.110 --initial-dashboard-password=wangsheng --initial-dashboard-user admin --dashboard-password-noupdate --allow-fqdn-hostname --config /etc/ceph/initial-config-primary-cluster.yaml --allow-overwrite ... Verifying IP 192.168.10.110 port 3300 ... Cannot bind to IP 192.168.10.110 port 3300: [Errno 98] Address already in use ERROR: Cannot bind to IP 192.168.10.110 port 3300: [Errno 98] Address already in use cephadm ls | grep -i FSID "fsid" : "265fdbaa-528c-11f0-9401-bc2411f9a113" , cephadm rm-cluster --force --fsid 265fdbaa-528c-11f0-9401-bc2411f9a113 ss -tunlp | grep 3300 可见已经没有输出了
问题解决 进程状态异常
1
2
3
4
5
6
7
8
9
10
ceph orch ps | grep error rgw.realm.zone.cephadm-1.qfehta cephadm-1 *:80 error 112s ago 32m - - <unknown> <unknown> <unknown> rgw.realm.zone.cephadm-2.vluxwt cephadm-2 *:80 error 112s ago 32m - - <unknown> <unknown> <unknown> ceph orch daemon restart rgw.realm.zone.cephadm-1.qfehta Scheduled to restart rgw.realm.zone.cephadm-1.qfehta on host 'cephadm-1' ceph orch daemon restart rgw.realm.zone.cephadm-2.vluxwt Scheduled to restart rgw.realm.zone.cephadm-2.vluxwt on host 'cephadm-2'