CNCF 开源项目,把 K8s Worker 节点上的本地/远程存储转为 Persistent Volume,以下是这几种方案的对比
维度
Local PV Hostpath
Local PV LVM
Local PV ZFS
Replicated PV Mayastor
底层技术
文件系统目录 (Ext4/XFS)
LVM 逻辑卷
ZFS 文件系统
SPDK + NVMe-oF
存储类型
文件存储
块存储
文件+块存储
块存储
数据副本
1份(单节点)
1份(单节点)
1份(单节点)
2+份(跨节点同步)
节点故障容忍
❌
❌
❌
✅
快照
❌
✅
✅ 秒级
✅
克隆
❌
✅
✅
✅
扩容
❌
✅ (需VG有空间)
✅
✅
压缩
❌
❌
✅ 透明压缩
❌
数据校验
❌
❌
✅ 防 bit rot
❌
去重
❌
❌
✅ (可选)
❌
加密
❌
✅ (dm-crypt)
✅ (原生)
❌
IO 额外开销
零
极低
低
< 10%
额外内存开销
无
极低
较高 (ARC 缓存)
中等 (hugepages)
节点准备
创建目录
lvm2 + VG
ZFS + Pool
hugepages + nvme-tcp + 节点标签
部署难度
⭐ 最简单
⭐⭐
⭐⭐⭐
⭐⭐⭐⭐
适用场景
分布式DB自带HA (MongoDB, Elastic, MinIO)
需要快照/扩容的单机应用
对数据完整性要求高、需压缩
单机DB需存储层HA、跨AZ容灾
StorageClass
openebs-hostpathopenebs-lvm (需自建)openebs-zfspv (需自建)openebs-single-replica
Local PV Hostpath模式类似于local-path模式,直接使用本地文件系统的路径,使用文件存储
Local PV LVM使用Linux LVM作为存储卷,使用块存储
Local PV ZFS是一个完整的文件系统 + 卷管理器 + 数据校验器一体
这里仅进行hostpath、lvm和zfs的实验
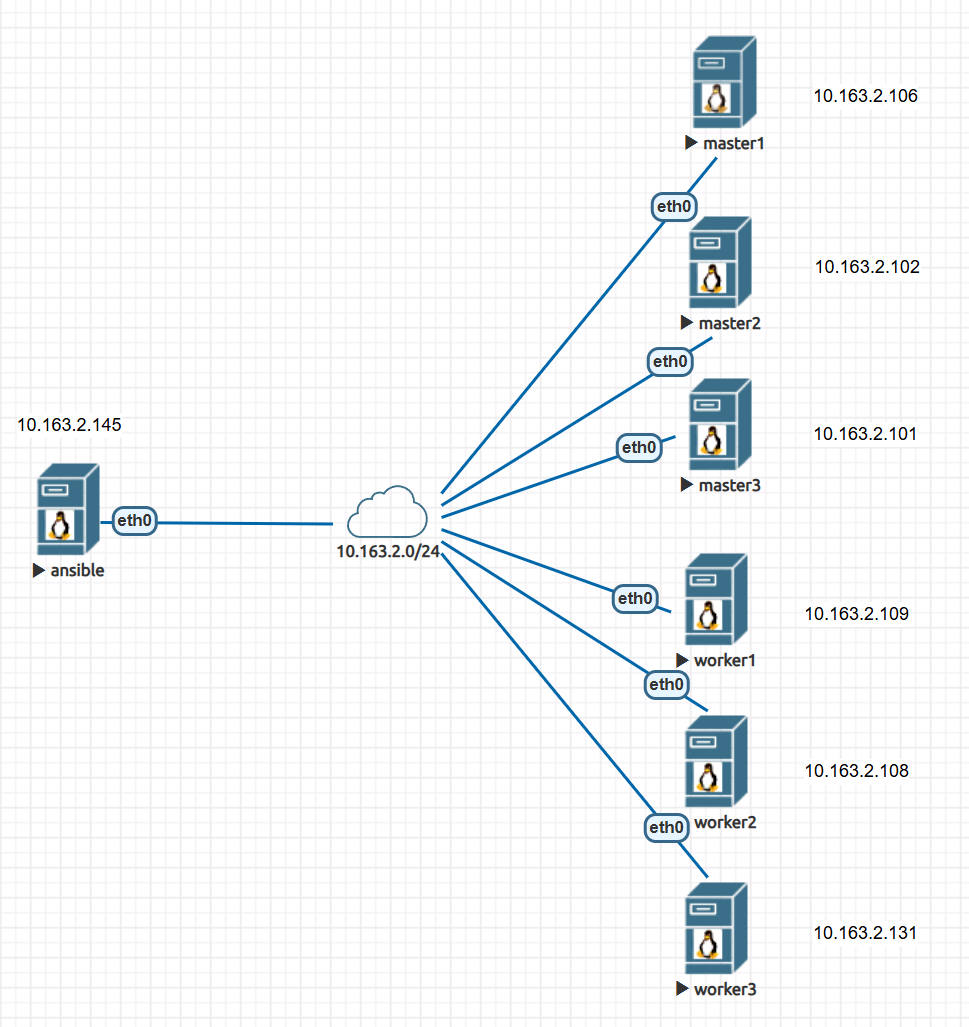
环境说明
1
2
3
4
5
6
7
8
9
10
10.163.2.145 ansible 10.163.2.106 master1.cluster.local master1 10.163.2.102 master2.cluster.local master2 10.163.2.101 master3.cluster.local master3 10.163.2.109 worker1.cluster.local worker1 10.163.2.108 worker2.cluster.local worker2 10.163.2.131 worker3.cluster.local worker3 /dev/sdb 50G 空闲 localpath 路径/root/data
部署与使用openebs localpath模式 参考文档:OpenEBS Installation | OpenEBS Docs
基本上是推荐helm部署,这里基本上只重一个使用,不重具体的配置,所以我就不拉取然后改values.yaml了,那真没必要
1 2 3 4 5 6 7 8 9 10 11 12 13 14 15 16 17 18 19 20 21 22 23 24 25 26 27 28 29 30 31 32 33 34 35 36 37 38 39 40 41 42 43 44 45 46 47 48 49 50 51 52 53 54 55 56 57 58 59 60 61 62 63 64 65 66 67 68 69 70 71 72 73 74 75 76 77 78 79 80 81 82 83 84 85 86 87 curl https://raw.githubusercontent.com/helm/helm/main/scripts/get-helm-3 | bash snap install yq helm repo add openebs https://openebs.github.io/openebs helm repo update helm search repo openebs/openebs NAME CHART VERSION APP VERSION DESCRIPTION openebs/openebs 4.5.1 4.5.1 Containerized Attached Storage for Kubernetes helm pull openebs/openebs --version 4.5.1 --untar cd openebs/helm install openebs --namespace openebs openebs/openebs \ --set engines.replicated.mayastor.enabled=false \ --set engines.local.lvm.enabled=false \ --set engines.local.zfs.enabled=false \ --set loki.enabled=false \ --set alloy.enabled=false \ --set localpv-provisioner.localpv.basePath=/root/data \ --create-namespace kubectl get pods -n openebs NAME READY STATUS RESTARTS AGE openebs-localpv-provisioner-859b9bf8c-6fqz7 1/1 Running 0 87s kubectl get sc NAME PROVISIONER RECLAIMPOLICY VOLUMEBINDINGMODE ALLOWVOLUMEEXPANSION AGE openebs-hostpath openebs.io/local Delete WaitForFirstConsumer false 2m8s cat > test-deployment.yaml <<EOF apiVersion: v1 kind: PersistentVolumeClaim metadata: name: openebs-test-pvc spec: storageClassName: openebs-hostpath accessModes: - ReadWriteOnce resources: requests: storage: 1Gi --- # Deployment apiVersion: apps/v1 kind: Deployment metadata: name: openebs-test labels: app: openebs-test spec: replicas: 1 selector: matchLabels: app: openebs-test template: metadata: labels: app: openebs-test spec: containers: - name: busybox image: busybox:latest command: ["sh", "-c", "while true; do echo \"$(date) hello from $(hostname)\" >> /data/test.log; sleep 5; done"] volumeMounts: - name: data mountPath: /data volumes: - name: data persistentVolumeClaim: claimName: openebs-test-pvc EOF kubectl apply -f test-deployment.yaml kubectl get pods NAME READY STATUS RESTARTS AGE openebs-test-666b6d6d4-gzznq 1/1 Running 0 14s kubectl get pvc NAME STATUS VOLUME CAPACITY ACCESS MODES STORAGECLASS AGE openebs-test-pvc Bound pvc-553ef869-b293-44c9-96be-ba89d86590bc 1Gi RWO openebs-hostpath 28s
部署与使用openebs lvm模式 准备工作与部署 LVM 模式需要在每个节点做准备工作
1 2 3 4 5 6 7 8 9 10 11 12 13 14 15 16 17 18 19 20 21 22 23 24 25 26 27 28 29 rpm -q lvm2 lvm2-2.03.12-10.el8.x86_64 modprobe dm-snapshot pvcreate /dev/sdb vgcreate csi-lvm /dev/sdb helm upgrade openebs --namespace openebs openebs/openebs \ --set engines.replicated.mayastor.enabled=false \ --set engines.local.lvm.enabled=true \ --set engines.local.zfs.enabled=false \ --set loki.enabled=false \ --set alloy.enabled=false \ --set localpv-provisioner.localpv.basePath=/root/data \ --reuse-values kubectl get pods -n openebs NAME READY STATUS RESTARTS AGE openebs-localpv-provisioner-859b9bf8c-6fqz7 1/1 Running 0 26m openebs-lvm-localpv-controller-5cffb58f69-7mlcw 5/5 Running 2 (2m44s ago) 4m1s openebs-lvm-localpv-node-7fv8f 2/2 Running 0 4m1s openebs-lvm-localpv-node-7schs 2/2 Running 0 4m1s openebs-lvm-localpv-node-b7nmz 2/2 Running 1 (3m18s ago) 4m1s openebs-lvm-localpv-node-dqtjb 2/2 Running 0 4m1s openebs-lvm-localpv-node-lfx68 2/2 Running 0 4m1s openebs-lvm-localpv-node-zlqwc 2/2 Running 0 4m1s
创建SC 可以看到这种openebs-lvm数据可以支持动态扩容的ALLOWVOLUMEEXPANSION
1
2
3
4
5
6
7
8
9
10
11
12
13
14
15
16
17
18
19
cat > csi-lvm-sc.yaml <<'EOF' apiVersion: storage.k8s.io/v1 kind: StorageClass metadata: name: openebs-lvm provisioner: local.csi.openebs.io parameters: storage: "lvm" volgroup: "csi-lvm" reclaimPolicy: Delete volumeBindingMode: WaitForFirstConsumer allowVolumeExpansion: true EOF kubectl apply -f csi-lvm-sc.yaml kubectl get sc NAME PROVISIONER RECLAIMPOLICY VOLUMEBINDINGMODE ALLOWVOLUMEEXPANSION AGE openebs-hostpath openebs.io/local Delete WaitForFirstConsumer false 32m openebs-lvm local.csi.openebs.io Delete WaitForFirstConsumer true 7s
使用SC与挂载 1 2 3 4 5 6 7 8 9 10 11 12 13 14 15 16 17 18 19 20 21 22 23 24 25 26 27 28 29 30 31 32 33 34 35 36 37 38 39 40 41 42 43 44 45 46 47 cat > test-lvm-deployment.yaml << EOF apiVersion: v1 kind: PersistentVolumeClaim metadata: name: openebs-lvm-test-pvc spec: storageClassName: openebs-lvm accessModes: - ReadWriteOnce resources: requests: storage: 2Gi --- apiVersion: apps/v1 kind: Deployment metadata: name: lvm-test labels: app: lvm-test spec: replicas: 1 selector: matchLabels: app: lvm-test template: metadata: labels: app: lvm-test spec: containers: - name: busybox image: busybox:latest command: ["sh", "-c", "while true; do echo \"$(date) lvm test from $(hostname)\" >> /data/test.log; sleep 5; done"] volumeMounts: - name: data mountPath: /data volumes: - name: data persistentVolumeClaim: claimName: openebs-lvm-test-pvc EOF kubectl apply -f test-lvm-deployment.yaml kubectl get pods NAME READY STATUS RESTARTS AGE lvm-test-7c6c56d5d5-ffpft 1/1 Running 0 71s openebs-test-666b6d6d4-5vv2x 1/1 Running 0 6m19s
测试lvm pvc扩容 1 2 3 4 5 6 7 8 9 10 11 12 kubectl get pvc NAME STATUS VOLUME CAPACITY ACCESS MODES STORAGECLASS AGE openebs-lvm-test-pvc Bound pvc-e728e9ab-9493-4d42-96f3-4a2053eb4e95 2Gi RWO openebs-lvm 2m8s openebs-test-pvc Bound pvc-376318f1-8526-4d59-99f2-d936ca694748 1Gi RWO openebs-hostpath 9m15s kubectl edit pvc openebs-lvm-test-pvc 将2Gi改为20Gi kubectl get pvc NAME STATUS VOLUME CAPACITY ACCESS MODES STORAGECLASS AGE openebs-lvm-test-pvc Bound pvc-e728e9ab-9493-4d42-96f3-4a2053eb4e95 20Gi RWO openebs-lvm 4m7s openebs-test-pvc Bound pvc-376318f1-8526-4d59-99f2-d936ca694748 1Gi RWO openebs-hostpath 11m
部署与使用openebs ZFS模式
数据校验 透明压缩 秒级快照(写时复制 ARC 读缓存(内存作为缓存 自动数据修复(从mirror自动恢复
安装ZFS模块 每个节点
1 2 3 4 5 dnf install -y epel-release dnf install -y https://zfsonlinux.org/epel/zfs-release-2-2.el8.noarch.rpm dnf install -y kernel-devel-$(uname -r) dnf install -y zfs modprobe zfs
创建 ZFS Pool 这里也需要块设备,而且需要直接在块设备上建,所以之前的LVM也需要删除
在所有worker上进行
1 2 3 4 5 6 7 8 9 10 11 12 13 14 15 16 17 18 19 20 21 kubectl delete -f test-lvm-deployment.yaml vgremove -f csi-lvm pvremove -f /dev/sdb zpool create openebs-zpool /dev/sdb zpool status pool: openebs-zpool state: ONLINE config: NAME STATE READ WRITE CKSUM openebs-zpool ONLINE 0 0 0 sdb ONLINE 0 0 0 errors: No known data errors zfs list NAME USED AVAIL REFER MOUNTPOINT openebs-zpool 106K 48.0G 24K /openebs-zpool
helm开启openebs ZFS 引擎 1 2 3 4 5 6 7 8 9 10 11 12 13 14 15 16 17 18 19 helm upgrade openebs --namespace openebs openebs/openebs \ --set engines.replicated.mayastor.enabled=false \ --set engines.local.lvm.enabled=false \ --set engines.local.zfs.enabled=true \ --set loki.enabled=false \ --set alloy.enabled=false \ --set localpv-provisioner.localpv.basePath=/root/data \ --reuse-values kubectl get pods -n openebs NAME READY STATUS RESTARTS AGE openebs-localpv-provisioner-859b9bf8c-6fqz7 1/1 Running 1 (77m ago) 15h openebs-zfs-localpv-controller-677b887fb4-p2w6d 5/5 Running 2 (6m15s ago) 12m openebs-zfs-localpv-node-5xgzj 2/2 Running 1 (35m ago) 35m openebs-zfs-localpv-node-9cfcj 2/2 Running 2 (34m ago) 35m openebs-zfs-localpv-node-czwwr 2/2 Running 1 (35m ago) 35m openebs-zfs-localpv-node-l5psd 2/2 Running 2 (34m ago) 35m openebs-zfs-localpv-node-m4n26 2/2 Running 1 (35m ago) 35m openebs-zfs-localpv-node-r4j4j 2/2 Running 1 (11m ago) 11m
创建 ZFS StorageClass 1 2 3 4 5 6 7 8 9 10 11 12 13 14 15 16 17 18 19 20 21 cat > zfs-sc.yaml <<EOF apiVersion: storage.k8s.io/v1 kind: StorageClass metadata: name: openebs-zfs provisioner: zfs.csi.openebs.io parameters: poolname: openebs-zpool # ZFS 池名 fstype: zfs # 文件系统类型,可选 zfs 或 ext4/xfs compression: "lz4" # 压缩功能 reclaimPolicy: Delete volumeBindingMode: WaitForFirstConsumer allowVolumeExpansion: true EOF kubectl apply -f zfs-sc.yaml kubectl get sc NAME PROVISIONER RECLAIMPOLICY VOLUMEBINDINGMODE ALLOWVOLUMEEXPANSION AGE openebs-hostpath openebs.io/local Delete WaitForFirstConsumer false 16h openebs-lvm local.csi.openebs.io Delete WaitForFirstConsumer true 15h openebs-zfs zfs.csi.openebs.io Delete WaitForFirstConsumer true 4s
测试 PVC + Deployment 1 2 3 4 5 6 7 8 9 10 11 12 13 14 15 16 17 18 19 20 21 22 23 24 25 26 27 28 29 30 31 32 33 34 35 cat > zfs-test.yaml <<EOF --- apiVersion: v1 kind: PersistentVolumeClaim metadata: name: zfspv-test spec: accessModes: [ReadWriteOnce] storageClassName: openebs-zfs resources: requests: storage: 1Gi --- apiVersion: v1 kind: Pod metadata: name: zfspv-test spec: containers: - name: app image: busybox command: ["sh", "-c", "echo 'hello zfs' > /data/test.txt && sleep 3600"] volumeMounts: - mountPath: /data name: storage volumes: - name: storage persistentVolumeClaim: claimName: zfspv-test EOF kubectl apply -f zfs-test.yaml kubectl get pods NAME READY STATUS RESTARTS AGE zfspv-test 1/1 Running 0 6s
测试 ZFS功能 这是 ZFS 模式区别于 hostpath/lvm 的核心
快照→变更→克隆/回滚
快照:变更kubectl create -f 一个 VolumeSnapshot 变更:模拟中间发生的数据变化 克隆:从快照创建新 PVC 回滚:恢复成为旧版本
1 2 3 4 5 6 7 8 9 10 11 12 13 14 15 16 17 18 19 20 21 22 23 24 25 26 27 28 29 30 31 32 33 34 35 36 37 38 39 40 41 42 43 44 45 46 47 48 49 50 51 52 53 54 55 56 57 58 59 60 61 62 63 64 65 66 67 68 69 70 71 72 73 74 75 76 77 78 79 80 81 82 83 84 85 86 87 88 89 90 91 92 93 94 1.写入测试数据 kubectl exec zfspv-test -- sh -c 'echo "v1-original" > /data/version.txt && cat /data/version.txt' 2.创建快照crd cat > snapshotclass.yaml <<EOF apiVersion: snapshot.storage.k8s.io/v1 kind: VolumeSnapshotClass metadata: name: zfs-snapclass driver: zfs.csi.openebs.io deletionPolicy: Delete EOF kubectl apply -f snapshotclass.yaml 3.创建pvc zfspv-test的快照 cat > snapshot.yaml <<EOF apiVersion: snapshot.storage.k8s.io/v1 kind: VolumeSnapshot metadata: name: zfspv-snap1 spec: volumeSnapshotClassName: zfs-snapclass source: persistentVolumeClaimName: zfspv-test EOF kubectl apply -f snapshot.yaml volumesnapshot.snapshot.storage.k8s.io/zfspv-snap1 created kubectl get volumesnapshot zfspv-snap1 NAME READYTOUSE SOURCEPVC SOURCESNAPSHOTCONTENT RESTORESIZE SNAPSHOTCLASS SNAPSHOTCONTENT CREATIONTIME AGE zfspv-snap1 true zfspv-test 1Gi zfs-snapclass snapcontent-3e6f4202-ccc3-4bcd-9e5f-a63971ac5874 27s 28s 已经可以看到有快照了 4.修改数据(模拟变更) kubectl exec zfspv-test -- sh -c 'echo "v2-modified" >> /data/version.txt && cat /data/version.txt' 5.从快照克隆新卷 cat > clone-pvc.yaml <<EOF apiVersion: v1 kind: PersistentVolumeClaim metadata: name: zfspv-clone spec: accessModes: [ReadWriteOnce] storageClassName: openebs-zfs dataSource: name: zfspv-snap1 # 快照名 kind: VolumeSnapshot apiGroup: snapshot.storage.k8s.io resources: requests: storage: 1Gi # 必须大于等于原PVC EOF kubectl apply -f clone-pvc.yaml kubectl get pvc NAME STATUS VOLUME CAPACITY ACCESS MODES STORAGECLASS AGE openebs-test-pvc Bound pvc-376318f1-8526-4d59-99f2-d936ca694748 1Gi RWO openebs-hostpath 15h zfspv-clone Pending openebs-zfs 7s zfspv-test Bound pvc-63e6fd74-e920-4a96-86a0-d2c3a2a7151a 1Gi RWO openebs-zfs 15m 6.恢复(回滚) kubectl exec zfspv-test -- cat /data/version.txt v1-original v2-modified kubectl delete pod zfspv-test kubectl get zfsvolumes -A | grep pvc-63e6fd74 openebs pvc-63e6fd74-e920-4a96-86a0-d2c3a2a7151a openebs-zpool worker1 1073741824 Ready zfs 17m zfs list NAME USED AVAIL REFER MOUNTPOINT openebs-zpool 222K 48.0G 24K /openebs-zpool openebs-zpool/pvc-63e6fd74-e920-4a96-86a0-d2c3a2a7151a 38K 1024M 25K legacy zfs rollback openebs-zpool/pvc-63e6fd74-e920-4a96-86a0-d2c3a2a7151a@snapshot-3e6f4202-ccc3-4bcd-9e5f-a63971ac5874 apiVersion: v1 kind: PersistentVolumeClaim metadata: name: zfspv-restored spec: accessModes: [ReadWriteOnce] storageClassName: openebs-zfs dataSource: name: zfspv-snap1 kind: VolumeSnapshot apiGroup: snapshot.storage.k8s.io resources: requests: storage: 1Gi
压缩验证 使用透明压缩功能需要在sc配置中添加对应字段compression: “lz4”
写入数据后看 zfs get compression, compressratio openebs-zpool/
1 2 3 4 5 6 7 8 9 10 11 12 yes AAAAAAAAAAAAAAAAAAAAAAAAAAAAAAAAAAAAAAAA | head -c 200000000 > /data/compress_test.binzfs get used,refcompressratio,compressratio,refer openebs-zpool/pvc-ddeaa3d5-5eeb-4e72-b20f-4768012231a3 NAME PROPERTY VALUE SOURCE openebs-zpool/pvc-ddeaa3d5-5eeb-4e72-b20f-4768012231a3 used 1.55M - openebs-zpool/pvc-ddeaa3d5-5eeb-4e72-b20f-4768012231a3 refcompressratio 125.43x - openebs-zpool/pvc-ddeaa3d5-5eeb-4e72-b20f-4768012231a3 compressratio 125.43x - openebs-zpool/pvc-ddeaa3d5-5eeb-4e72-b20f-4768012231a3 referenced 1.55M - 可见125倍的压缩率
扩容 1 2 3 4 5 6 7 kubectl edit pvc zfspv-test kubectl get pvc NAME STATUS VOLUME CAPACITY ACCESS MODES STORAGECLASS AGE openebs-test-pvc Bound pvc-376318f1-8526-4d59-99f2-d936ca694748 1Gi RWO openebs-hostpath 16h zfspv-clone Pending openebs-zfs 27m zfspv-test Bound pvc-ddeaa3d5-5eeb-4e72-b20f-4768012231a3 5Gi RWO openebs-zfs 14m